


3 Exercises to Improve Your Overhead Mobility
by Nick Bechtold, PT, DPT, OCS, CSCS, CF-L1
One of the most common mobility restrictions that we see with our athletes and physical therapy clientele is limited overhead mobility, aka the ability to reach your arms fully overhead.
Limitations in the overhead position tend to come from three main areas:
1. The muscles around the shoulder (pecs, lats, and posterior shoulder)
2. The thoracic spine (the mid-back)
3. The shoulder joint
Typically, we can address each of these areas of restriction with a few simple movements.
Here are 3 of our favorite exercises restore your overhead mobility:
1. Eccentric Overhead Opener using PVC
Target: The Lats and Pecs
Use a PVC pipe or dowel with a small weight placed in the middle
Lay on a bench with your hips up at 90/90 as shown
Slowly lower the PVC back into the overhead position while allowing gravity to assist in achieving in lower closer to the floor
Perform this mobilization 2 sets x 10-12 reps taking 5 seconds to slowly lower into the end-range
If you don’t have access to a PVC you can also use a light dumbbell
2. Thoracic Extension Mobilization over Foam Roller
Target: The Thoracic Spine (mid-back)
Lay back over the foam roller as shown
Keep a “tuck” in your low back to prevent extension
With hands behind the head, arch back over the foam roller to facilitate extension in the thoracic spine
Perform 2-3 sets x 10-12 reps with 3-5 second hold
Move up/down as needed to find the areas that feel most restricted
3. Down Dog
Target: Scapular Upward Rotation to improve Joint Mechanics
Starting from a tall plank, push the hands into the ground as you push your chest back to your feet
As you push your chest to your feet maintain the push into the ground to help facilitate upward rotation from the scapula (shoulder blade)
Perform 2 sets x 8-10 reps with 3 second hold at the end
If you’re struggling with shoulder pain or stiffness in the overhead position, start here!
f you have pain with any of these movements or find limited change in your symptoms then we advise scheduling a full evaluation with a physical therapist for more in-depth evaluation.
Local to Bozeman, Montana? Click the link above to schedule a Free Discovery Visit to learn how you can move past pain and maximize your performance in your exercise and in life!

If You Don’t Use it , You Lose it: The Importance of Strength Training as we Age
By Dr. Anna Bechtold, PT, DPT, OCS, CF-L1
There is a quote going around on social media that is says “I’m not training for my summer body; I’m training for my old lady/man body”. This is a great mentality to have when approaching physical training with the goal to maximize your longevity. The more muscle mass you have as you age and the more you continue perform high impact activities including such as jumping and running, the stronger your bones will be as you age. Like they say, “A body in motion, stays in motion.”
As we age, maintaining an active lifestyle becomes even more increasingly vital for our overall well-being. Physical therapy plays a pivotal role in helping aging adults not only manage pain and recover from injuries but also in promoting strength, flexibility, and maintaining independence. One fundamental principle that drives effective physical therapy treatment is known as progressive overload, aka progressing the intensity of your training over time. This can be achieved by adding weight, increasing volume, increasing time under tension and, in the case of improving bone density, adding impact to your workouts. Adding load greater than just your body weight is essential for bone health, increasing strength, and improving endurance. In the context of physical therapy for aging adults, progressive overload becomes even more critical as it helps counteract the natural decline in muscle mass and bone density that often accompanies aging.
Here are additional benefits of progressive overload for aging adults:
Increased Strength and Function: Progressive overload promotes muscle hypertrophy and enhances muscular strength, leading to improved functional abilities and reduced risk of falls.
Bone Health: Weight-bearing exercises that incorporate progressive overload can help maintain bone density and reduce the risk of osteoporosis-related fractures.
Joint Health: Strengthening muscles around arthritic joints can alleviate pain and improve joint stability, enhancing overall mobility and quality of life.
Mental Well-being: Regular exercise, including progressive overload training, has been linked to reduced symptoms of depression and anxiety, promoting mental well-being in aging adults.
There is never a bad time to start strength training and you are never “too old” to begin. If you find yourself limiting your activities due to pain or weakness and you don’t know where to start, reach out to us today. Not only can we help you get out of pain, but we can also help you feel stronger than you ever thought you could be. That way you spend more time on the trails, in the gym, and enjoying life with your family and less time in the nursing home.
Pain in the Front of the Knee? Start Here!
Anterior knee pain, or pain located in the front of the knee, is a common complaint that we see in our performance physical therapy clinic located in Bozeman, MT. This pain is commonly referred to as patellofemoral pain or Patellofemoral Pain Syndrome (PFPS). This is a fancy term to basically say that an individual has pain around or associated with their kneecap (the patella).
We see this frequently with individuals who are doing a high volume of running, jumping, hiking, and squatting. Luckily, it’s an area that responds extremely well to physical therapy treatment, especially strengthening of the quadriceps and hip musculature.
If you find yourself dealing with pain in the front of your knee, here is where we typically have our clients start:
Wall Sit Isometric Holds: 5-6 reps x 30-45 seconds
Make sure that your feet are out past your toes and you can sit back into the wall.
Focus on engaging the quads.
Start without weight and progress to holding weight as shown.

Fire Hydrant: 3 sets x 12-15 reps per side
Place band around the knees
Stand with a slight bend in the stance knee
Kick out and slightly back, feeling side of the glutes working
Rear Foot Elevated Split Squat: 3 sets x 8-10 reps per side
Keep your chest up and sit back as you lower into the squat
Ensure your knee is centered over the second to third toe
Add weight in opposite hand as able
These exercises are by no means a one size fits all and make require modifications based on the individual. However, they are good place to start for introducing some easy loading to the hip and knee while minimizing pressure on the kneecap.
If you like the exercises or know someone that could benefit from them, go ahead and share this blog with a friend.
If you have any questions for us or are interested in working with us virtually or in-person, then send us a message here: frontdesk@movementphysiomt.com
Follow Movement Physio on Instagram for more helpful PT and fitness content @movementphysiomt
Thank you!

Our Favorite Exercises for Neck Pain and Stiffness
Pain and stiffness in the neck is one of the most common issues that we treat in our physical therapy practice. It’s an area that we have had a high level of success. It’s also an area that responds extremely well to physical therapy treatment.
There are many factors that can lead to an individual experiencing pain and stiffness in their neck. While every individual case is different, here are some of the common factors that we with our clients in Bozeman:
- Prolonged time spent working on the computer for work
- Stiffness in the upper back requiring more demand on the neck
- Inactivity leading to weakness in the neck and upper back
- Impaired movement coordination when performing overhead movements
Here are a few of our favorite exercises to address these impairments:
Thoracic Extension Mobilization with Foam Roller
Start with 1-2 minutes over the area that feels the most restricted
Keep the hips on the ground, brace the core to prevent excessive extension in the low back
Cervical Rotation SNAG
Place band as shown
Start with 2 sets of 8-10 reps per side
Single Arm Row
Pull the hand to the pocket and relax the neck
Start with 2 sets x 8-12 reps per side
Bottom-up Kettlebell Carry
Start with a light but challenging weight
Perform 3-4 reps of 25-30 ft. per side
These exercises are not intended to be a “one-size-fits-all” plan for each individual but can be a great place to start if you are dealing with neck pain and stiffness. Many individuals will often benefit from a plan combining manual therapy techniques with a blend of exercises similar those above.
We always recommend seeking help from a professional, especially if you have been dealing with pain for a prolonged period of time (greater than a couple of months) or are experiencing pain radiating from you neck into your upper back or arm.
If you’re dealing with neck pain and stiffness that’s holding you back from living your life, find a PT to work with you to create a plan to address your goals.
If you’re local to Bozeman, MT, then we would love to be the ones to guide you back to 100%.
Have a question? Shoot us a message. We’re happy to any questions even if you aren’t looking to come in for a visit.

Our Top 3 Exercises for a Strong, Resilient Back
Back pain is one of the most common complaints that we see in our physical therapy practice located in Bozeman, MT. In fact, 80% of people will experience an episode of low back pain at some point in their life. For that reason, we are big proponents of helping our clients building the strength and resilience to tackle all of life’s challenges.
Here are the top 3 exercises that we use daily with our physical therapy clients in Bozeman:
Sorenson Hold
Build to 3-5 reps of a 1 minute hold
Suitcase March or Carry
Start with 3 sets x 12-15 marches per side or 25-50 ft. carry
The Deadlift
Start with 3-5 sets of 3-5 reps
These exercises should be challenging but not painful. If you do experience pain with any of the movements, feel free to reach out to us or seek the help from a local professional.
If you’re currently dealing with a low back injury and ready to get out of pain and back to enjoying life, let’s schedule a time to chat.
3 Tips for an Injury Free Running Season
3 Tips for an Injury Free Running Season
by Nick Bechtold, PT, DPT, OCS, CSCS, CF-L1
Warmer weather is here and one of our favorite Bozeman summer activities is getting out for a good run. Whether it’s on the road or on the trails, running is a great way to get outside, improve your health and fitness, and alleviate stress. However, as physical therapists we often see clients present with running-related injuries once the mileage starts to ramp up. Here are three principles that we utilize with our clients to help keep them out of pain and crushing their weekly runs.
1. Follow the 10% Rule
Most running-related injuries happen from doing do much too soon. This typically happens when we increase mileage or intensity too quickly. The biggest issue here is that we don’t provide the body with adequate periods of recovery between runs.
Due to the high demands on the connective tissue and joints, the body needs gradual exposure to higher training loads to fully adapt. A good rule of thumb when increasing weekly mileage is to limit increases to 10%.
For example, let’s say you are averaging 10 miles of running per week. The following week, aim for a total weekly volume of 11 miles. While it may seem like a small increase, the gradual progression week to week will build to larger volumes while providing ample time to recover.
Keep in mind, this rule isn’t perfect but it’s a good place to start. Ultimately, you still need to listen to how your body is responding.
2. Optimize Your Cadence
Cadence, or the number of steps per minute (spm), is one of the easiest factors to modify to help improve running efficiency. We’ve also found that it’s the easiest way to reduce knee and ankle pain with our clients. You see, as cadence increases, it will automatically reduce stride length and shift towards more of a midfoot strike position. This will reduce strain on the joints and limit the “braking force” experienced with a heel strike position.
So what cadence are we shooting for?
Ideally 160-180 spm is our goal.
How do we increase cadence with our physical therapy clients?
We start by establishing their current cadence. We do this by counting the number of steps taken in 30 seconds and multiplying by 2. From there, we use a metronome app that allows us to adjust the cadence to a desired number. Let’s say a client has a cadence of 140 spm. Just like the 10% rule for volume and intensity, we want to make sure we are gradually progressing cadence as well.
For this individual we would likely set the metronome to 150-160 spm and have them work to match the cadence while running on a treadmill. Once they establish the ability to match the cadence, we would then have them practice this cadence during their weekly runs. They can even use the metronome app for the first 1-2 minutes of the run to establish their cadence before continuing the run. After 1-2 weeks, we would then increase cadence by an additional 10-15 spm and continue the progression until we have reaching between 160-180 spm. Throughout this process, we would monitor for symptoms and modify as needed.
If you want to retrain your cadence, check out this video further explaining how we do it:
3. Build a Strong Base
Strength training is extremely important for anyone looking to avoid injuries with running. Unfortunately, many runners sacrifice strength training because they either don’t like it or don’t want to get bulky.
However, strength training is really the best way to build what we call “load tolerance” in the muscles, connective tissue, and joints.
Put simply, this allows your body to withstand the demands of running without getting beat up.
What are the most important areas to strengthen for runners?
· Lateral glutes
· Quads
· Hamstrings
· Calves
Don’t know where to start? Check out this video for some of our favorite exercises for runners:
If you are dealing with a running related injury and want to enjoy the Bozeman summer, you deserve to see a physical therapist that not only knows how to rehab injured runners but also shares a passion for running.
It just so happens that our PTs at Movement Physio are just that!

Soft Tissue Injuries Need PEACE and Love
Most of us are familiar with the RICE principles for managing soft tissue injuries. RICE stands for Rest, Ice, Compression, and Elevation. While these principles had their time and place, research has evolved and guidelines have improved to guide recovery from soft tissue injury.
Soft tissue injuries, such as sprains, strains, and contusions, are a common occurrence in sports and physical activity. With such a large population of active individuals in the Bozeman area, soft tissue injuries are an extremely common injury that we treat and manage. They can be a frustrating and painful experience, but with the right approach, they can be effectively managed and treated. The British Journal of Sports Medicine (BJSM) has developed the P.E.A.C.E. and L.O.V.E. principles as an evidence-based approach to managing soft tissue injuries.
P.E.A.C.E. stands for:
Protection: The first step in managing a soft tissue injury is to protect the affected area from further damage. This may involve using a brace or crutches, or modifying activities to avoid aggravating the injury.
Rest: Rest is essential for the healing process. BJSM recommends avoiding activities that cause pain or discomfort, and allowing the affected area to rest and recover.
Ice: Applying ice to the affected area can help to reduce inflammation and pain. BJSM recommends using ice for 20-30 minutes at a time, several times a day, for the first 48-72 hours after the injury.
Compression: Compression can help to reduce swelling and provide support to the affected area. BJSM recommends using a compression bandage or sleeve for the first 48-72 hours after the injury.
Elevation: Elevating the affected area above the level of the heart can help to reduce swelling. BJSM recommends elevating the affected area for at least 15-20 minutes at a time, several times a day, for the first 48-72 hours after the injury.
L.O.V.E. stands for:
Load: Let pain guide your gradual return to normal activities. Your body will tell you when it’s safe to increase load.
Optimism: Condition your brain for optimal recovery by being confident and positive.
Vascularization: BJSM recommends activities that promote blood flow to the affected area, such as gentle massage or active movement.
Exercise: Restore mobility, strength, and proprioception by adopting an active approach to recovery.
The P.E.A.C.E. and L.O.V.E. principles provide a comprehensive, evidence-based approach to managing soft tissue injuries. By following these principles, you can effectively manage injury, reduce pain and inflammation, and promote healing.
If you’re dealing with an injury and not sure where to begin, contact us and let’s get you back to crushing your goals in the gym or on the mountain!
For more information, check out the full article here.

Creating Lifestyle Change: Habits lead to Goals
By Nick Bechtold, PT, DPT, OCS, CSCS, CF-L1
"We are what we repeatedly do. Excellence, then, is not an act, but a habit" -Aristotle.
The beginning of a new year can be an exciting and motivating time to create lasting lifestyle change and become a better version of yourself. However, research shows that over 90% of New Year’s resolutions ultimately fail. Why is this? There are many factors but one of the most common reasons is that people set lofty goals but fail to create the habits and steps needed to get them there. If you want to set yourself apart from the majority and actually reach your goal, then follow these tips:
Small Actions Lead to Big Actions “The Snowball Effect”
The most important part of creating a lifestyle change is the implementation of small, actionable habits that move you closer to your goal. These small actions, over time, have a compounding effect and will ultimately snowball into larger and larger actions. Choose 1-2 habits that you can implement immediately and that tie in with your big picture goal. For example, you want to lose 30 pounds (I chose this example because we all know weight loss is a common goal). From the outset, this goal can seem daunting. However, starting with simple goals such as a daily 30 minute walk and prioritizing protein at each meal will get the snowball rolling. Maybe after a month of just these two habits you find yourself a few pounds down, ready to join an exercise class and eager to learn more about nutrition. Keep this trend going and the snowball continues to grow.
Create SMART Goals
SMART is an acronym for the following:
Specific: Define your goal in detail and be specific as possible.
Measurable: You must be able to measure or quantify if you are reaching your goal.
Actionable: It must be a goal that you can realistically accomplish in the desired time-frame.
Relevant: The goal should align with your long-term objective.
Time-based: Create a specific time-frame or end-date.
By setting objective, SMART goals you not only create an outline of steps towards accomplishing your goal but you have specific variable to measure whether you are on the path to achieving your goals or you need to modify the plan.
Surround Yourself with Positive Influences
One of my favorite quotes goes something like this, “You are the average of the five people you spend the most time with.” This is powerful when it comes to creating lasting habit change. Are those five people complaining about their circumstances, drinking everyday, and scoffing at the idea of exercise or are those five people pushing to achieve career goals, working out regularly, and eating healthy.
I’m not saying you have to bail on your friends and family, but if you are serious about creating healthy changes then you must seriously consider whether your social circle is a help or a hinderance towards accomplishing your goal. If it’s a hinderance, then consider joining a community of like-minded individuals who can push you closer to reaching your goal instead of further away from it.
Be Consistent
Most research will point to 21 days as the time needed to create a new habit. In reality, it is probably much longer than this. However, it still shows that lasting change takes time and consistency, even when the initial motivation falters. Knowing this, set aside time for your new habit. Do you want to get in better shape? Plan a time to work out. Whether it’s 30 minutes or an hour, stick to this time and don’t give yourself an excuse to miss it. It doesn’t matter if your motivated, tired, or sore, just get it done. A good metaphor to reinforce consistent action is a piggy bank. Everyday you follow your habit you put a penny in the piggy bank (maybe $1 adjusted for inflation) and over time you accumulate a sizable savings. The same thing goes for accomplishing a big goal. Consistent actions done repeatedly accumulate into sizable change.
Eliminate Barriers
To further improve your chances of maintaining consistency, deliberately eliminate any barriers that challenge your ability to accomplish your new habits. Do you have to drive 15 minutes out of your way to get to the gym? Find a gym that is on your way to/from work or find a home workout plan to get started. Do you feel too tired to cook when you get home from work? Plan 1-2 hours on the weekend to meal prep for the week. Are you unsure of what workouts to do? Hire a coach to design a custom plan that fits your goals and lifestyle.
Creating lifestyle change is hard but with these tips, patience, and consistent action, you can create habits that allow you to reach any goal you set out to accomplish. If you don’t know where to start, have an injury holding you back, or need help creating a plan to tackle your health and fitness goals heading into the new year, then let’s work together to get it done.
Shoulder Injuries in Crossfit
If you’re a Crossfit athlete pushing to achieve high-level fitness goals, then at some point you will likely deal with an injury. While CrossFit has not been shown to lead to higher rates of injury compared to similar fitness activities, the shoulder has been shown to be the most injured area in CrossFit participants. For that reason, it’s important to understand the reasons why the shoulder is injured and what steps can be taken to reduce injury risk.
Inappropriate Progression of Volume aka Too Much Too Soon
The basis of the CrossFit methodology is “constantly varied, high-intensity, functional movements”. This concept makes it a powerful fitness modality, particularly the high-intensity aspect. However, it can be a gift and a curse for those that are new to the sport or ramp up their activity too quickly.
High levels of intensity also require adequate recovery. When we train, we stress the muscles, connective tissue, and joints. With appropriate rest, this allows the structures to adapt, repair, and become stronger over time. Without this rest, these tissues continue to break down, become weaker, and eventually fail, leading to injury. For those who are new to CrossFit or have taken some time off, it’s recommended to ramp up volume gradually and listen to your body. Even for those who are experienced, a split of three days on and two days off is advised to keep intensity high while providing ample recovery between workouts.
The video below explains this concept with a nice illustration.
Lack of Shoulder Strength
The shoulder is the most mobile joint in the body. This allows for a large range of movement but also requires a large amount of strength and stability for adequate control. CrossFit, more than other similar recreational activities, requires a high level of strength and dynamic stability.
Movements such as the snatch, jerk, handstand push-up, and kipping movements are particularly challenging for the shoulder joint and make it more susceptible to injury if a good base level of strength is not in place. The muscles surrounding the scapula and rotator cuff are the best to target when looking to improving overall strength and dynamic stabilization of the shoulder.
The following video highlights some of our favorite exercises to improve shoulder strength and stability.
Impaired Shoulder Mobility
Lack of motion in the shoulder joint prevents the shoulder from accessing the range of motion required to perform common CrossFit movements. The movements that typically require the highest degree of motion in the shoulder are kipping movements such as kipping pull-ups, toes-to-bar, and the muscle-up. Kipping movements require a strong arch position in which the shoulders are taken into end-range flexion to help generate momentum and allow for high force production.
This amount of flexion is typically beyond what typical daily activities require. We find that many individuals with impaired mobility in the shoulder have a particularly hard time accessing full shoulder flexion during these movements. Without full range of motion in the shoulder, excessive stress is placed on the joint and soft tissues around the shoulder ultimately putting the shoulder at higher risk for injury.
The structures that we find limit shoulder mobility the most are the latissimus dorsi and pectorals. Below are some of our go-to exercises to address these common limitations and improve mobility in the shoulder.
Impaired Thoracic Mobility
The thoracic spine, or the region in the mid and upper back, is a common area of impaired mobility in the spine and often overlooked when it comes to assessing shoulder mobility. When we lift our arms into an overhead position, it requires an adequate amount of extension in the thoracic spine. If motion is limited in the thoracic spine, we often see excessive strain placed on the front of the shoulder or movement compensations such as overextension at the lumbar spine. This is especially important in more complex movements such as the overhead squat in which we squat with the arms in full flexion. If the thoracic motion is limited, we tend to see this result in excessive strain placed upon the front of the shoulder.
If you’ve got a stiff back, you need to try the exercises highlighted in the video below.
If you’re someone dealing with a shoulder injury holding you back from reaching your fitness goals, then let us help. Whether you are local to Bozeman or not, we have options available for everyone.
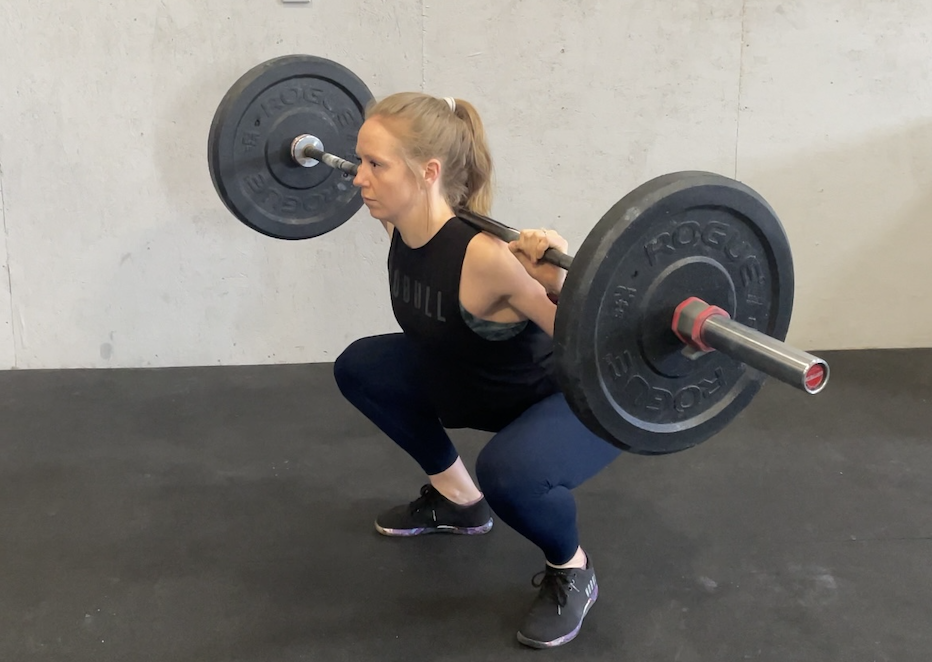
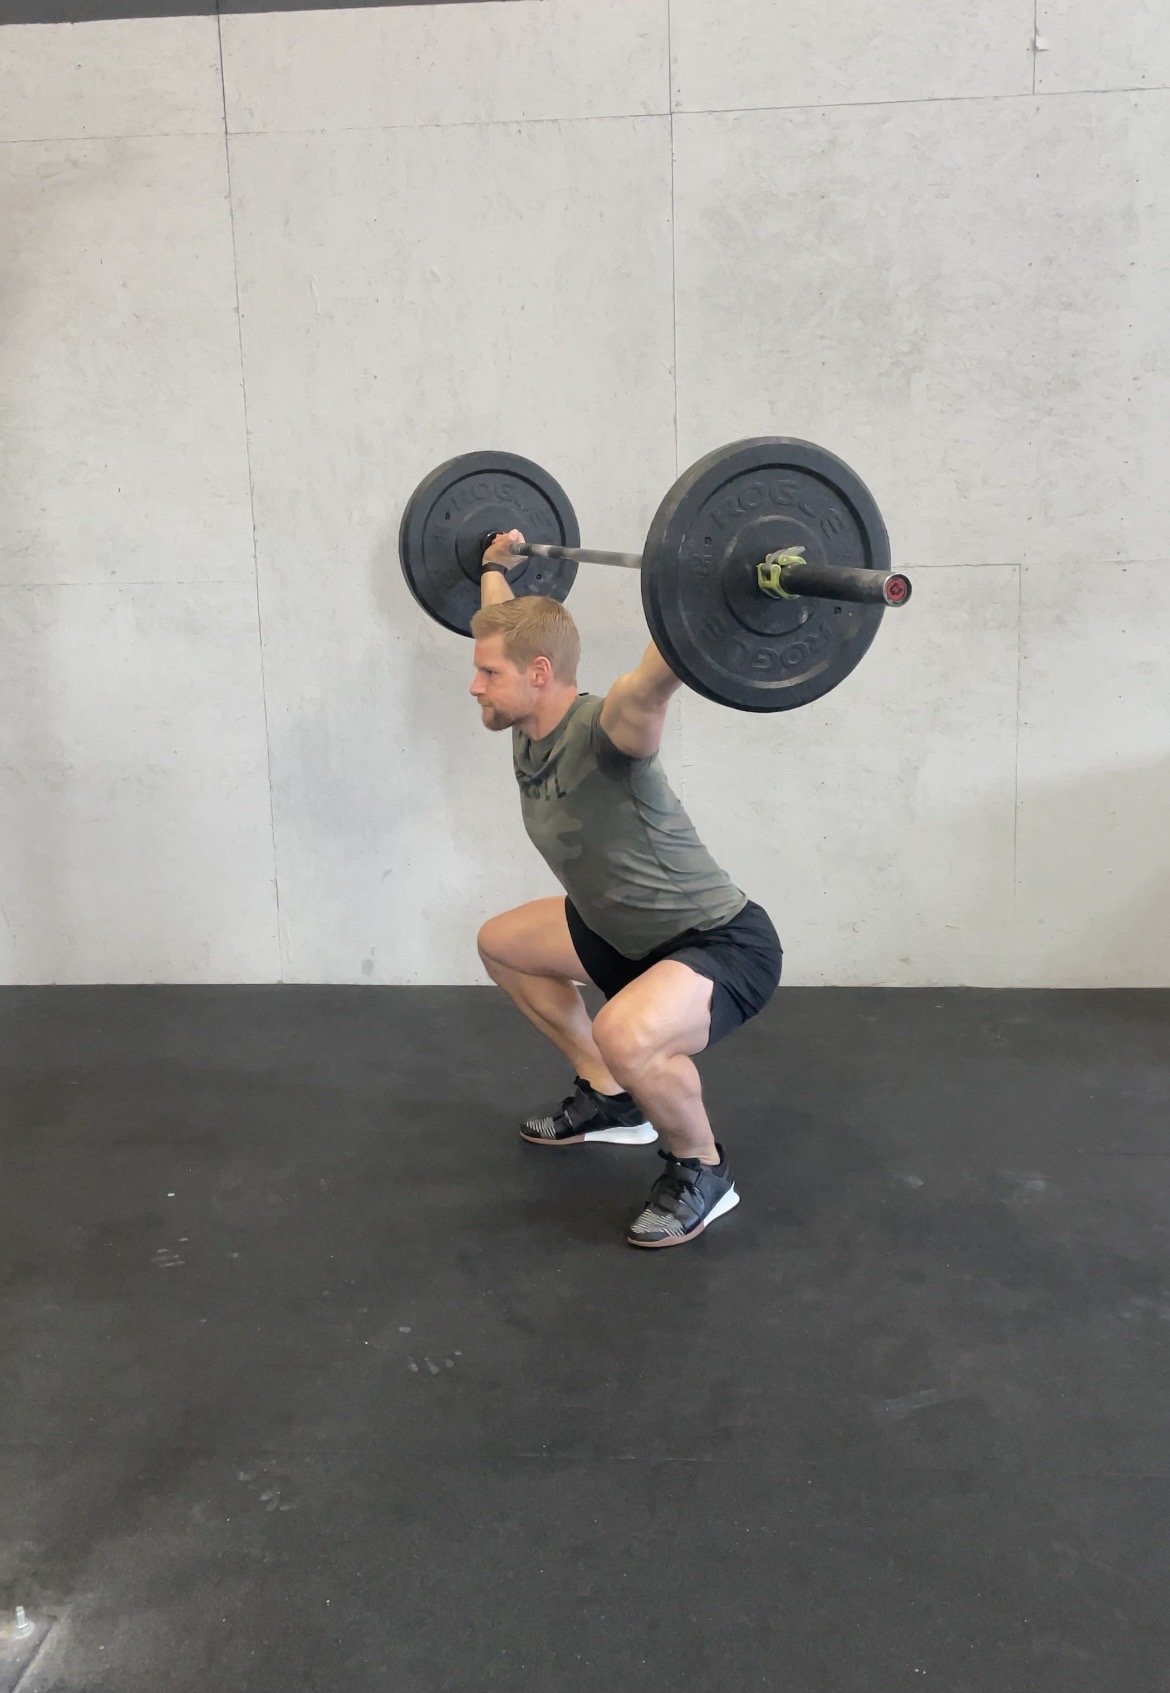
Why it is Safe To Squat Below Parallel (and why you should)
Why it is Safe to Squat Below Parallel
For a long time, we were taught to not squat below parallel, to not let your knees go past your toes for fear that it will damage your knees. Not only is this not true, but it is doing your body a disservice, can hurt your knees more, and place excess strain on your spinal column. Studies have found that squatting only to 90 degrees places the highest compressive forces at the patella (kneecap), with compressive forces decreasing as you increase your squat depth below parallel with something called “the wrapping effect”. Squatting past 90 degrees demonstrated greater load distribution and transfer of forces, ultimately decreasing the load in your knees.
Looking up the chain to the hips and the trunk, halting movement at 90 degrees, the angle of the hips and the trunk increases. With this increase, there is additional anterior shear forces placed upon the intervertebral discs and ligaments in the spine and a greater demand on the hip musculature. The shearing loads to the spine were the lowest with squat depth below parallel. What this means is with limiting the squat to 90 degrees, a greater load was placed on the discs in the spine and the hip musculature when compared to a below parallel squat in which the knees must travel past the toes.
In picture A below, you can see that by allowing the knees to travel past the toes it allows for a more upright torso position than compared to picture B where his knees are blocked and travel past the toes is prevents. Adding to the benefits of squatting below parallel, studies found a thickening of cartilage in areas of the knee joint along with the quadriceps tendon meaning greater stress tolerance and tolerance to load.
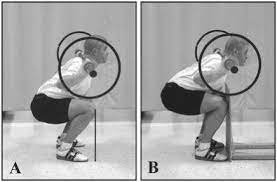
“When compared with half and quarter squats, in the deep squat, lower knee joint and spinal joint stress can be expected… the deep squat presents an effective training exercise for protection against injuries and strengthening of the lower extremity.”
The caveat with all of this is that if squatting below parallel causes knee pain or reproduces your knee pain, then for that period it is encouraged to only squat through your pain-free motion and gradually increase range of motion as symptoms improve.
If you have knee pain with squatting, contact us at Movement Physio and let us help you return to full and pain-free squatting!
Sources:
Hartmann, H., Wirth, K., & Klusemann, M. (2013). Analysis of the load on the knee joint and vertebral column with
changes in squatting depth and weight load. Sports Medicine, 43(10), 993–1008.
https://doi.org/10.1007/s40279-013-0073-6
FRY, ANDREW C., SMITH, J. CHADWICK, & SCHILLING, BRIAN K. (2003). Effect of knee position on hip and knee
torques during the barbell squat. The Journal of Strength and Conditioning Research, 17(4), 629.
https://doi.org/10.1519/1533-4287(2003)017<0629:eokpoh>2.0.co;2
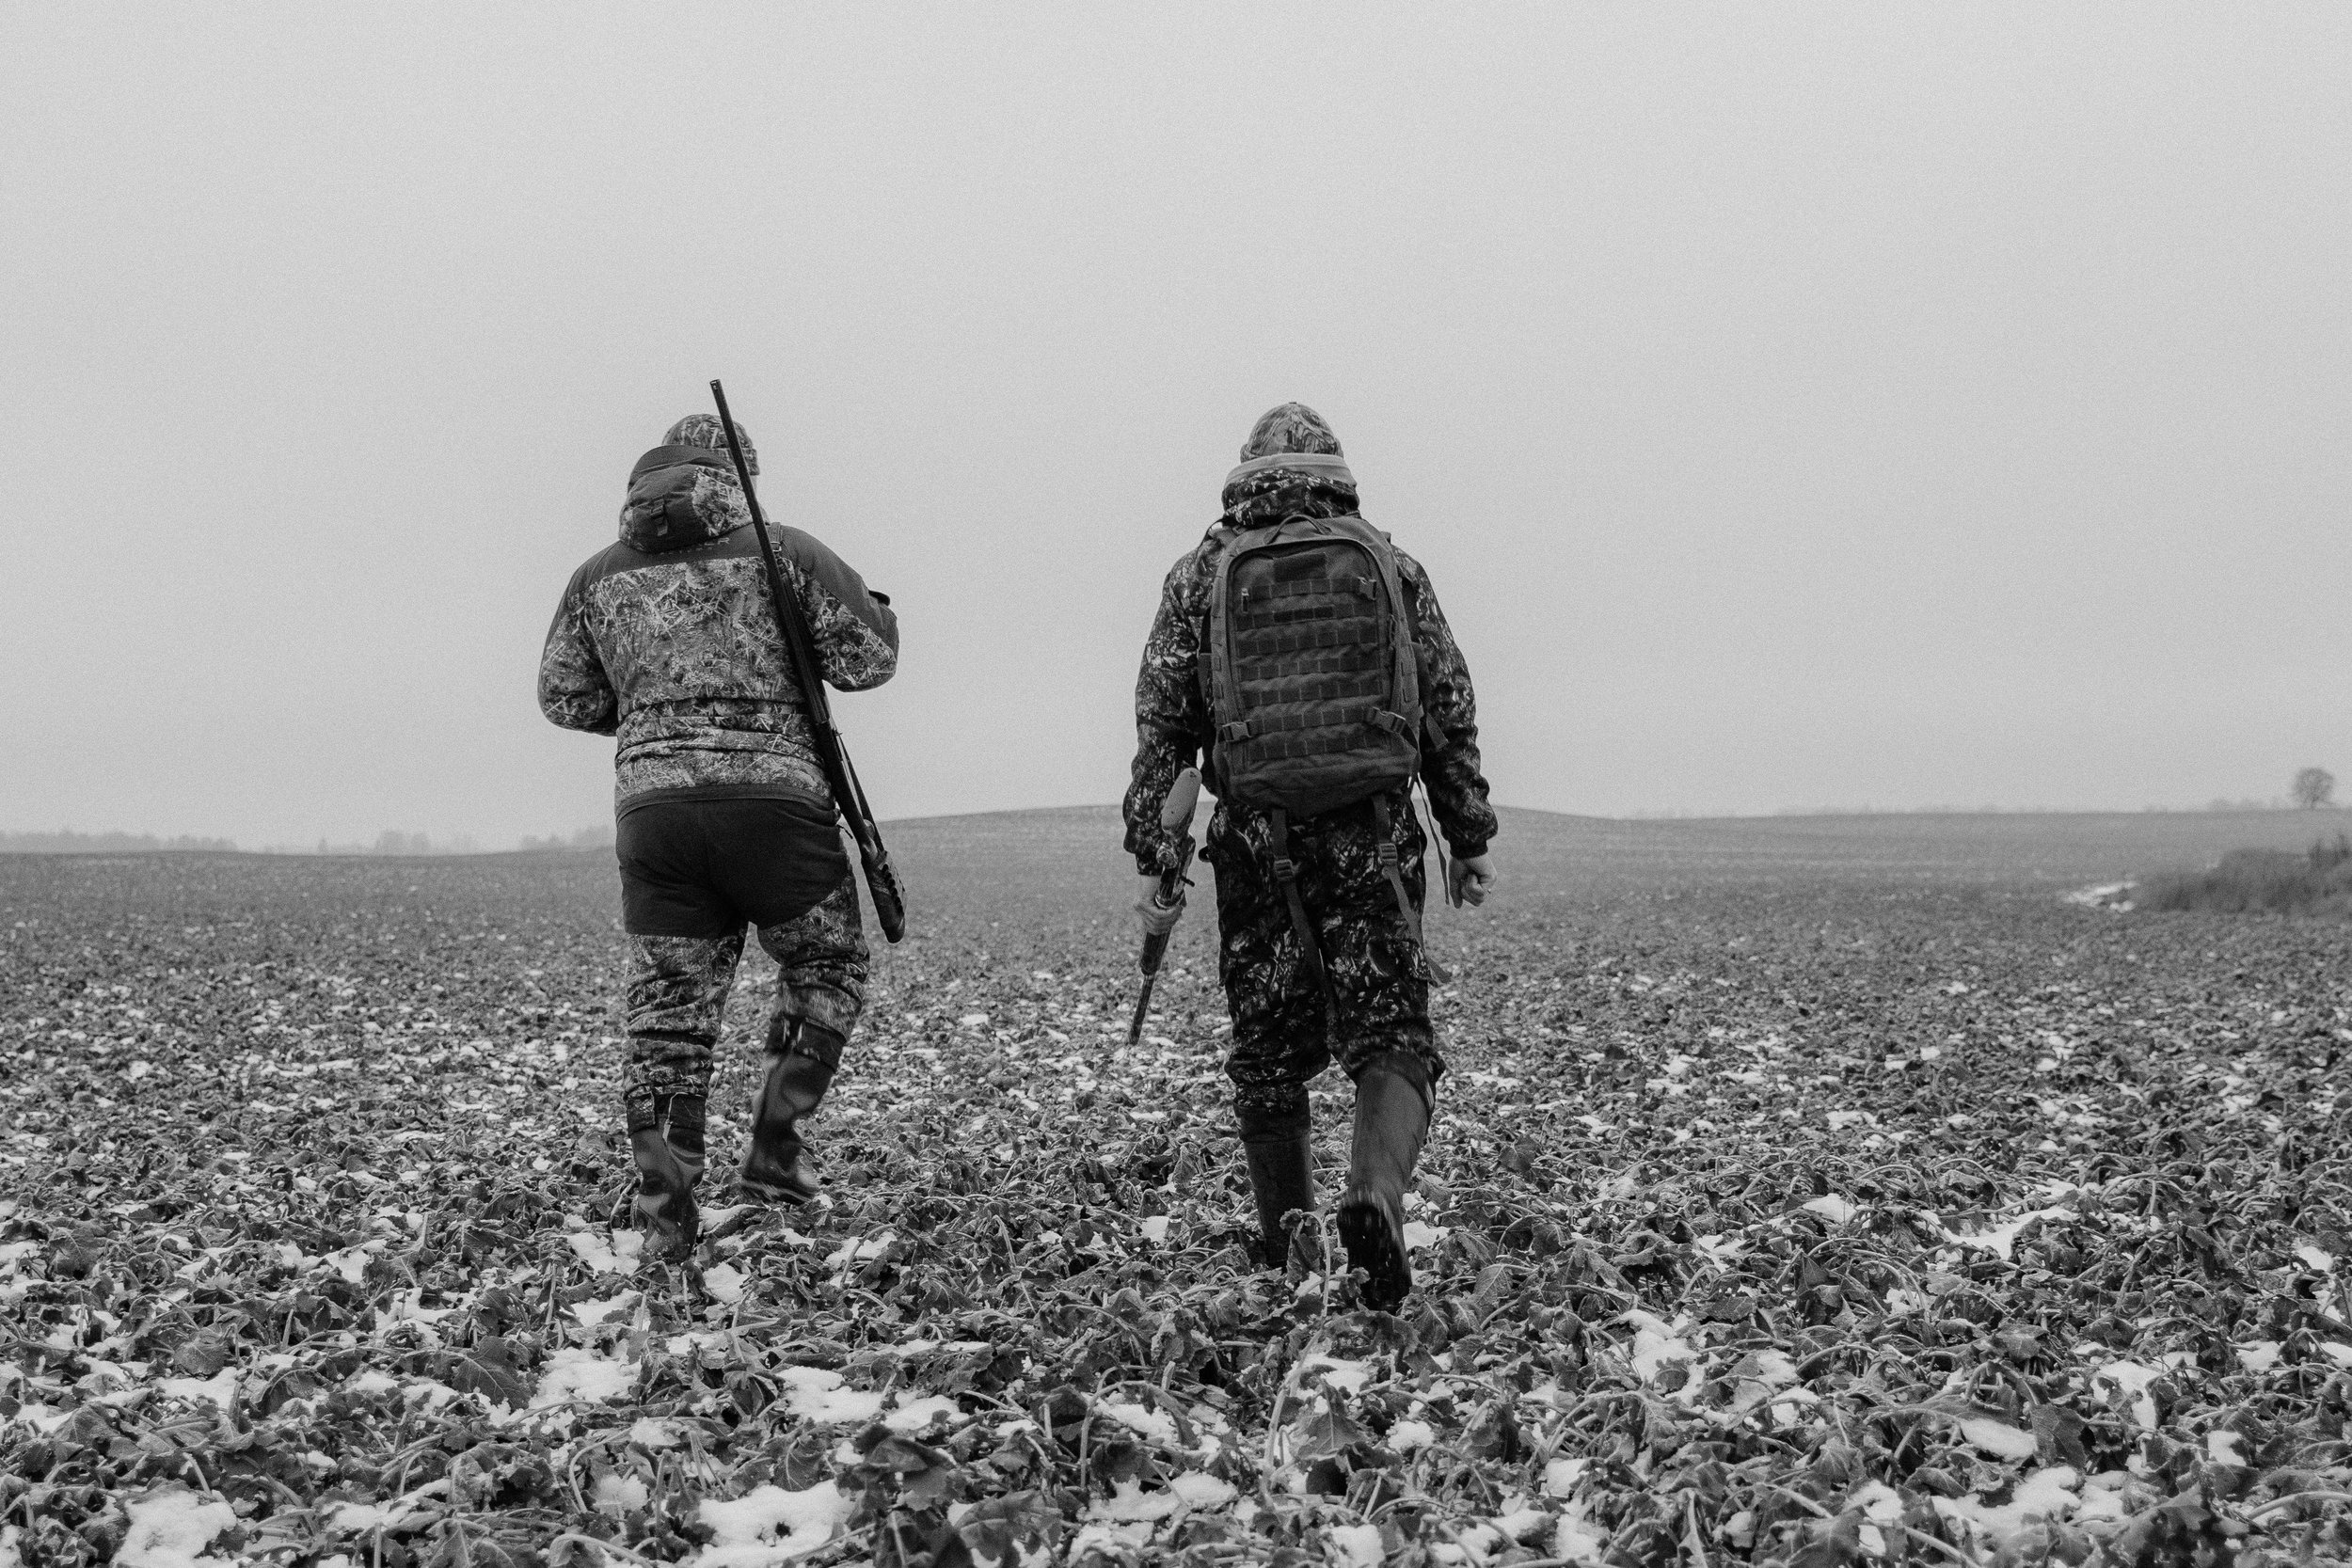
Hunt Prep: How to Reduce Your Risk of Injury this Hunting Season
For many Montanans, hunting season is a highly anticipated time each fall. It provides us with a chance to get out into the backcountry, create memories with friends and family, and put some meat in the freezer. It’s also a physically demanding activity that requires adequate preparation to maximize your chances of success. By following a few simple guidelines, you can increase your chances of success and return home injury-free.
Aim to Train for Both Strength and Endurance
The optimal fitness approach for a backcountry hunter includes exercises that build strength and increase metabolic conditioning. Resistance training (aka strength training) is beneficial for improving strength in our muscles and surrounding connective tissue. It also provides a protective effect to our joints by reducing stresses absorbed by the joints during repetitive activities such as climbing steep hills with a heavy pack. Metabolic conditioning improves the body’s ability to operate at varying heart rates and builds cardiovascular endurance. This approach includes a mix of slow, long-distance exercise at a low-to-moderate heart rate, as well as short, high-intensity intervals done at near-maximal exertion. Put simply, improving metabolic conditioning allows you to hunt longer while minimizing fatigue. Metaphorically speaking, strength-training builds a strong frame while metabolic conditioning develops a high-horsepower engine.
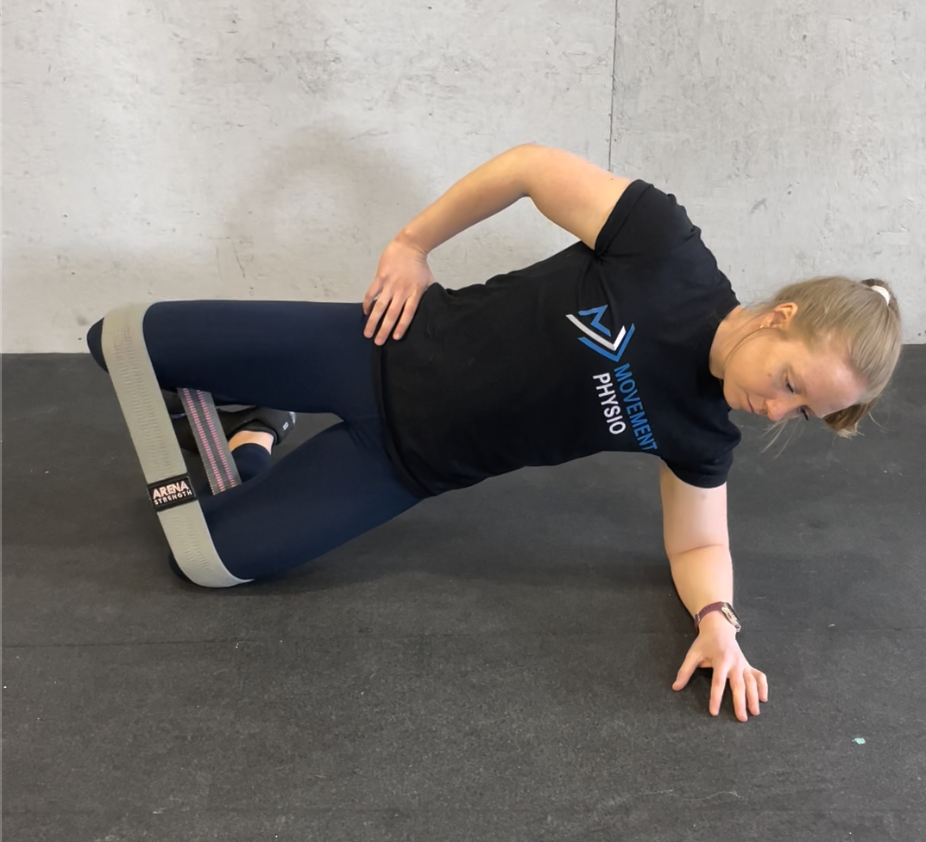
A Strong Core = A Healthy Back
A strong midline is crucial for protecting the back during the physical demands of a hunt. In the field, you’ll be carrying heavy packs, lifting quarters, and moving animals through varying terrain. To build a strong core capable of performing varying demands requires exercises that challenge every plane of motion and simulate the specific movements necessary for the hunt. If you aren’t sure where to begin, give the following exercises a try:
Heavy Carries: Single-arm Kettlebell Carry or Double front-rack Kettlebell Carry
Planks: Standard Plank, Side-plank, and Chinese Plank
Anti-rotation: Pallof press or Dumbbell Pull Through
Sled Work: Pushing and pulling
Follow a Progressive Plan
One of the main reasons hunters get injured is increasing activity too quickly once hunting season begins. We all know the people who sit on the couch all summer and magically expect to be hiking hard mountain miles in the fall. Without adequately progressing activity, your chance of tissue breakdown and injury increases. For this reason, it’s important to begin training at least six to eight weeks before the season. Aim to increase activity week-by-week until your training volume mimics the volume you expect to see during the season.
Address Pre-Existing Injuries
Before heading into the field, make sure to address any nagging injuries that could hamper your ability to perform. The last thing you need when chasing a bull is to have a seemingly small issue turn into a big pain, leaving you limping to the truck earlier than planned. The tips described can help in this process. However, it is best to consult with a trained professional, such as a physical therapist, who can help you address the issue and feel confident heading into opening weekend.

Low Back Pain? Here is Why Movement is Your Best Treatment
Low back pain occurs in 80% of the population in the United States, making it the most common cause of pain for which people seek out physical therapy. Most acute (<3 months) low back pain will often resolve itself within 6-8 weeks, but if not rehabbed or treated properly it can put you at risk for getting recurrent low back in the future. There is also a large population of people that experience chronic (>3months) low back pain that limits their ability to complete their daily tasks and have undergone multiple unsuccessful treatments, medications, and therapy.
The unique aspect of low back pain is that no person will present with the same symptoms regardless of the nature of the injury. Low back pain can occur from a specific movement or with no specific mechanism of injury. Therefore, no single exercise, manipulation/mobilization, or soft tissue mobilization can help everyone experiencing low back pain. While interventions like manual therapy, manipulation/mobilizations, and soft tissue mobilization are still very helpful for pain reduction, the most beneficial form of treatment for everyone across the board? MOVEMENT.
It may go against someone’s instinct and fear as movement may have created the pain. However, the less you move the more stiffness occurs resulting in increased pain and longer recovery time. The question remains, what type of exercise should you do? If you have chronic or severe low back pain, initial exercises and activity may look different than those with mild-moderate low back pain. First let’s talk cardiovascular activity. For those with mild to moderate and chronic low back symptoms, cardiovascular activity landing in the moderate to high intensity category that does not progressively increase their pain will decrease their pain and help them recover faster. Those with more severe or chronic low back pain, low impact cardiovascular activity such as walking or cycling on an upright or recumbent bike that will still allow them to increase their heart rate is extremely beneficial.
One part of treatment that is often unaddressed is adequately strengthening the spinal and abdominal musculature for full recovery and future injury prevention. Research has shown that for those with acute low back pain weight training for progressive strengthening of the back along with maintenance of aerobic fitness is important for pain reduction and future injury prevention. Additionally, progressive endurance and fitness exercises are helpful to reduce pain and improve function in patients that have chronic low back pain.
Don’t let low back pain create fear avoidance or make you feel bound to the couch or your bed. One of the best things that you can do to improve your pain and your function is to keep moving and do what you enjoy, as well as consult your PT for optimal recovery and return to daily life!
-Anna Bechtold, PT, DPT, OCS, CF-L1

Blood Flow Restriction (BFR) Training: Gaining Strength When Heavy Load Isn’t an Option
To improve the strength, size, and function of a muscle it is well known that moderate to high loads must be used to provide the necessary stimulus for tissue adaption. For those with injuries to a particular area this becomes a problem as they typically cannot tolerate exercises of a high enough intensity to stimulate the necessary changes needed to see true gains in strength and/or size.
For individuals not able to tolerate moderate to heavy weights, blood-flow restriction (BFR) training has been found to be very helpful. BFR is a training modality that involves the use of a specialized tourniquet (cuff) applied to the proximal aspect of a limb (usually at the upper arm or thigh) to induce occlusion of blood flow within the extremity. The cuff is typically inflated to a level which is adequate to impede all venous return while still allowing for partial arterial flow. Then, individuals typically perform an exercise utilizing 20-30% of their maximum with high repetitions (15-30 reps) for 3-5 sets with brief rest breaks of 30 seconds between. This protocol was formed following research conducted to determine an effective protocol to facilitate improvements in muscle strength and size using the BFR technique.
Sounds too good to be true. How is BFR able to achieve such impressive results with using low loads? Simply put, BFR training induces a hypoxic (low oxygen) environment within the muscle while also allowing for swelling within the limb from an accumulation of blood. These effects lead to an increase metabolic stress, increased cell swelling, activation of myogenic stem cells, and a release of anabolic hormones such as human growth hormone (HGH) and IGF-1. This combination of factors creates an environment within the muscle that stimulates increases in muscle strength and size.
At first glance, you may think the concept sounds dangerous. However, BFR has been found to be safe when applied appropriately and in individuals without contraindications for treatment. For this reason, it is important to consult with a practitioner trained in BFR prior to beginning a protocol. This will ensure allow for proper assessment of risk factors prior to implementing the protocol. If you’d like to know more about BFR or think it may be a useful to you, then reach out to one of our experts to learn more!
By Nick Bechtold, PT, DPT, OCS, CSCS, CF-L1

The Importance of Sleep for Performance
By Anna Bechtold PT, DPT, OCS, CF-L1
Everyone knows the feeling after they get a good night’s sleep, waking up feeling rested, energetic, ready to crush a workout and your workday. People spend roughly 1/3 of their life sleeping, however one third of the US population deals with sleep disturbances. Not only does sleep impact a person’s mood and energy level, but it is a critical period where the body recovers. Sleep is critical for pain relief, tissue healing, immune function, cardiovascular health, depression and anxiety, cognitive function and learning. Research has shown that sleep deprivation results in increased pain, poor tissue healing, reduced quality of life, depression and anxiety increase, difficulty learning new tasks, impaired memory and overall quality of life. The list goes on. It has also been shown to predispose you to higher risk of injury. Chronic lack of sleep or sleep disturbance can also predispose you to other major health problems including cardiovascular disease, diabetes, hypertension, obesity, and dementia.
Between 7-10 hours of quality sleep are optimal for overall function. Gone are the days where people pride themselves on how little sleep you get each night because you are too busy being productive. What happens though if pain is what is causing you to experience a lack of sleep or a lack of quality sleep? Often when dealing with an injury, your ability to sleep is impacted secondary to pain. There are multiple techniques to help prime your environment and body to get better quality sleep.
1. Consistently go to bed and get up at the same time each day.
2. Develop a relaxing bedtime routine (warm bath, meditation, stretching). Avoid
stimulating activities right before bed like watching TV or looking on your phone.
3. Make your room cold ranging between 60-65 degrees
4. Make sure the room is dark
5. Avoid vigorous exercise 2-3 hours prior to going to bed as it stimulates your body and
brain, creating a harder time calming down and relaxing.
6. Avoid caffeinated food or drinks at least 4 hours prior to sleep.
7. Avoid spicy food and alcohol at least 3 hours before bed.
8. Avoid daytime napping UNLESS you already get 7 hours of sleep separate from that nap.
9. Reserve your bedroom for sleep and sex. Do not eat, work, watch TV in bed.
Pick one or two of these techniques that are easily executed to start and add in others as you go. If you feel that you have issues with sleep because of injury, let us help you sleep better so you can perform better!
Reference:
Siengsukon, C. F., Al-Dughmi, M., & Stevens, S. (2017). Sleep Health Promotion: Practical Information for Physical Therapists. Physical Therapy, 97(8), 826-836. doi:10.1093/ptj/pzx057
Why Do Injuries Happen?
Injuries are complicated. Often, we like to blame a particular factor or movement as to why we get injured. However, it’s rarely that simple. In this article, I’d like to discuss some of the factors that predispose an individual to injury. Additionally, this information should help to guide your exercise and training in a way that minimizes injury risk and keeps you pushing towards your goals.
Total Training Volume
One of the most important factors leading to injury is an individual’s training volume. Volume, in this case, is the total time that someone is training over the course of a given period. Typically, it’s easiest to think of this over the course of a week. As you can imagine, excessive volume, especially when coupled with excessive intensity, can put an athlete at risk for sustaining an injury. For this reason, we recommend keeping your weekly volume between 5-6 days per week with at least one rest day. If you are new to exercise or have taken some time off, you may need to start with fewer days per week (3-4 days/week) and work your way up as your body adapts to the training stimulus.
Technique
Exercise technique is crucial for minimizing injury risk. Why is this? Well, proper technique ensures that structures are loaded properly to transfer force throughout the kinetic chain and maximize efficiency. Ideally, we want our muscles doing most of the work and our joints, ligaments, and tendons helping to stabilize and transfer the force throughout the body. Improper technique puts undue stress on passive structures and, over time, leads to irritation. For this reason, it’s important to dial in your technique early. It helps to have a coach or PT help when learning a new movement to help provide feedback and real-time adjustments that you are unable to identify yourself. It also helps to film yourself performing the movement frequently to observe and adjust accordingly.
Dramatic Spikes in Volume or Intensity
Many injuries that we see happen from simply doing too much, too soon. It’s easy when you start a new routine or program to get excited and wanted to push hard every day. Runners are a great example here. Typically, someone gets into running because they want to get in shape or lose weight (not what I recommend for either case by the way) or maybe they have taken some time off and are ready to get back to it. Often, the individual will just jump back into their previous routine or feel like they need to be running every day. You could see why this is a problem. Going from minimal activity to suddenly running several miles per day is a recipe for injury. With any activity, the body requires adequate time to adapt and recover from the physical stress that occurs during exercise. Your best bet is to ease into activity with a mindset of progression over the long-term. Exercise is something we should be trying to do for the rest of our lives, not the rest of the month.
Training Background
If you look at the top athlete in any gym, they probably have one big thing in common: they have been training for years. It’s easy to overlook just how important time spent training, also known as training age, is for both performance but also the ability to avoid injury. Why is this? With repeated exposure to an activity over months, years, and decades the body adapts to the specific demands of the activity and the structures that are repeatedly loaded become stronger and more resilient. Additionally, the individual becomes more coordinated and efficient with their movement. A great example is an Olympic weightlifter. It’s easy to watch someone perform a heavy clean and jerk and think, “that looks simple enough” only to attempt the same lift with a fraction of the weight and barely be able to complete the lift.
The best recommendation here is to simply be realistic with where you are at in your fitness journey. If you have an athletic background, that provides a good foundation for progression. However, if you are beginning a new exercise program or activity, it’s important to put in the time, be consistent, and allow your body to learn the movement properly and have time to adapt to the new demands.
Injury History
Previous injuries can be one of the biggest factors suggesting future injury risk. For example, a previous knee surgery, such as an ACL repair or meniscus repair, may predispose an individual to experience knee pain with training, especially with excessive volume or inadequate progression. This can be due to structural changes within the previously injury area but is often the result of the individual not adequately rehabbing the area leading to lingering deficits in range of motion, strength, or load tolerance. For this reason, it’s important to consider your previous injuries and assess whether they continue to limit you from certain movements. If so, you may need to spend some dedicated time to address any lingering limitations to ensure that a previous injury does not turn into a recurring injury. Lucky for you, we specialize in this sort of thing!
Recovery Strategies
Recovery from exercise is nearly as important as the hard efforts that we put in during training. Exercise stimulates changes within the body to allow us to become more stronger, faster, and generally more fit. However, without proper recovery, tissue breakdown from exercise exceeds the rate at which our body can repair. If this goes on for an extended period, you guessed it, injury can occur. How do you ensure adequate recovery? Here are a couple of factors to consider:
1. Nutrition
Ensure that you are getting an adequate level of calories for the level of activity that you are performing. Ideally, enough to sustain energy levels but not enough to lead to excessive weight gain. Beyond that, make sure that you are getting enough protein for muscle recovery (~0.8 grams/lb. of bodyweight) and a good mix of carbohydrates and fats. A generally recommendation for macronutrient ratios to start with would be (40% carb/30% protein/30% fat).
2. Sleep
If sleep could be bottled it would be the best performance enhancing drug on the market. Ok, maybe that is a bit excessive, but the list of benefits that are achieved through sleep are numerous. For hard-charging individuals, sleep allows our bodies and mind to recover from both a physical and psychological perspective. It also helps to regulate hormones throughout our body such as growth hormone, testosterone, estrogen, and cortisol. Proper regulation is key to help manage stress, stimulate muscle repair and growth, and regulate appetite. I could talk all day on sleep. To save you from more ranting, ensure that you are aiming to get at least 7 hours of sleep.
3. Stress
We all know that we need to manage our stress. Easier said than done. While it might not be the easiest thing to do, it doesn’t mean that we shouldn’t take a concerted effort to address the areas of stress in our life. Without getting too into the weeds, excessive stress leads to an increase in the hormone cortisol. While cortisol does have an important role in the body, excessive levels can lead to increased inflammation, tissue breakdown, anxiety, and a suppressed immune system. All these factors impair recovery and predispose an individual to injury.
If you are dealing with and injury and not sure where to start, let us help. Not only do we help you recover from the injury, but we can also help you to identify why you became injured in the first place. That way, you get past the injury and ensure that it doesn’t happen again.

Dry Needling: What is it and How Does it Work?
What is dry needling?
According to the American Physical Therapy Association (APTA), dry needling is defined as a skilled intervention that uses a thin filiform needle to penetrate the skin and stimulate underlying myofascial trigger points, muscular, and connective tissues for the management of neuromusculoskeletal pain and movement impairments. Dry Needling is a technique used to treat dysfunctions in skeletal muscle, fascia, and connective tissue, and, diminish persistent peripheral nociceptive input, and reduce or restore impairments of body structure and function leading to improved activity and participation.
Simply put, dry needling is a skilled intervention used by a trained clinician to desensitize irritable tissues, restore ROM, improve function, and create an environment to facilitate tissue healing. Dry needling can also be combined with electrical stimulation to improve muscle activation, provide biofeedback to the nervous system, and increase local tissue circulation to improve blood flow and reduce inflammation.
How is it different than acupuncture?
Although dry needling and acupuncture utilize the same type of needle, the treatment approaches vary significantly. Dry needling focuses on targeting and treating specific musculoskeletal structures such as muscles, ligaments, and tendons to reduce pain and dysfunction along common referral patterns. Acupuncture typically utilizes an Eastern medicine approach to normalize the body’s energy fields or “Chi” along the pathways connecting acupuncture points, known as meridians.
What to expect during a session of dry needling?
After performing a thorough examination, you and your therapist will discuss the option of dry needling, discuss any risk factors, and decide whether it is a good option for your treatment. If you both decide to proceed with dry needling, therapist will position you comfortably to allow for adequate exposure of the treatment area. They will then clean the area with a sanitizing agent and insert the needle. They may choose to gently move the needle in and out of the muscle, a term referred to as pistoning, to elicit a “twitch response” in the muscle. The twitch response often feels like a mild muscle cramp. The “twitch response” is a positive result allowing for physiological changes within the muscle such as reduced muscle tone and stiffness and a reduction in local inflammatory chemicals. You may also experience referral or reproduction of your familiar pain. Depending on the goal of the treatment, your clinician may decide to insert multiple needles or combine treatment with electrical stimulation to potentiate the treatment effects.
How many sessions of dry needling will you need?
While every individual situation is different, most people will experience significant improvement in symptoms within the first 2-3 sessions of dry needling. While we do find this technique extremely beneficial to reduce pain and restore function, it is important to note that long-term relief is typically achieved when combining dry needling with progressive exercise.
What are the side effects of dry needling?
The most common symptoms following dry needling include muscle soreness, fatigue, and potential bruising. While infection is a risk, it is rare as sterile needles are used in treatment and our we are careful to properly sanitize the area being treated.
What areas do we most commonly treat with the use of dry needling?
Overuse injuries include muscle strains and tendon/ligament sprains
Headaches
Neck pain
Low back pain
Epicondylitis (tennis or golfer’s elbow)
Rotator cuff injuries
Shoulder impingement
Carpal Tunnel syndrome
Piriformis syndrome
Patellar tendinitis
Achilles’ tendinopathy
Plantar fasciitis
If you are curious whether dry needling may be beneficial to help you get past pain and back to crushing your fitness goals, then shoot us an email or schedule a free 30-minute call with one of our therapists!
How to Continue Training While Dealing with an Injury
How to Continue Training While Dealing with an Injury
Written by Nick Bechtold, PT, DPT, OCS, CSCS, CF-L1
We all deal with injury at some point in our lives. They aren’t fun and can be extremely frustrating. However, for anyone involved in sport and pushing their physical training to reach new goals, injuries can be part of the game. Beyond the experience of physical pain, injuries also can also take psychological toll by potentially limiting our ability to work or preventing us from being a part of our given exercise community. For these reasons, it’s imperative that we keep individuals active and involved while we work with them. A common question that I’m often asked by clients is, “Well, what things can I still do while we deal with this injury?” Luckily, there are many options to continue training and staying active while working past an injury. In fact, there are very few (if any) times when you should completely avoid exercise while recovering from an injury. However, there are some considerations to keep in mind.
One of the most important aspects of dealing with and moving past an injury is identifying what lead to the injury in the first place. Injuries can be good learning experiences to help prevent them from happening again down the road. Some injuries are straight forward like when you step wrong while hiking and sprain your ankle or attempt to pick up a heavy box while moving and feel a twinge in your low back. However, many injuries are less direct. We often label these as overuse injuries. To put it simply, these are injuries that result from doing too much before the body has had time to adapt to that given stimulus. This concept can apply to any sport or recreational endeavor including weightlifting, mountain biking, running, and hunting. Using the runner as an example, the athlete is often trying to increase mileage, pace, or even elevation gain too rapidly without allowing adequate recovery time to allow the body to adapt and respond to the training load. This also applies to the Crossfit athlete who goes from 3-4 sessions per week to 6-7 sessions per week with a couple of two-a-days thrown in the mix.
Beyond addressing training load, it’s also important to address any imbalances that may have also contributed to the injury. Typically, these imbalances show up as limited joint or soft tissue mobility or decreased strength in a particular muscle group. When a tissue lacks the appropriate flexibility, strength, or endurance or a joint lacks adequate mobility, then excessive strain is often placed on a given structure. Over time, if the imbalance of stress is not addressed, injury can occur. Identifying the imbalances can be a tricky process. We may be a bit biased, but we feel that seeing a physical therapist can be invaluable. Physical therapists are equipped with the tools and training to provide an in-depth musculoskeletal evaluation and functional testing specific to the needs of your given sport or activity. It can be even more beneficial to see a PT that specializes in activities such as running or working with fitness athletes. Through this process we identify areas of weakness and/or limitation and provide a custom treatment approach including education, hands-on techniques to alleviate pain, exercise, guided activity progression, and 1-on-1 coaching. The goal in this process is to allow you to reach a point in which you are pain-free, back to full activity, and possess the knowledge and confidence to manage the issue independently going forward.
While directly treating the injured area, you should still emphasize maintaining or even improving fitness in other regions. If you are dealing with a lower body injury and can’t perform activities like running, biking, or squatting then shift your focus to upper body exercises. Vice versa if dealing with an upper extremity injury. Likewise, if you are unable to lift heavy during this time, maybe it’s a good time to work on building your cardiovascular engine. The goal during this time is to maintain fitness and aid healing to the injured area through improved systemic circulation. Additionally, if dealing with injury in only one limb then you should continue to exercise the opposing or uninjured side. In fact, training the uninvolved side can lead to improved recovery and strength on the injured side through a phenomenon referred to as cross-education.
Injuries are tough. They can also be an opportunity to learn, reflect, and grow as an athlete. By assessing your habits and training plan, you can identify any flaws in your approach and return from injury a stronger, smarter athlete going forward. Fortunately, as previously discussed, there are also many ways to stay active and continue training while you recover. If you are dealing with an injury and not sure where to start, we would love to help! Feel free to reach out with an email, call, or text and let us get you back to 100% and continue crushing your fitness goals.